
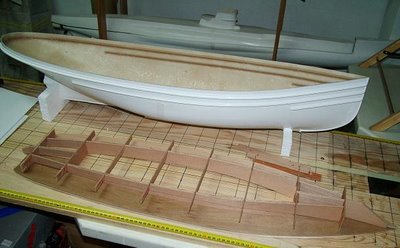
Rebocador escala 1/32 com 991 cm de comprimento produzido pela Dumas, reprodução de uma embarcação de trabalho a vapor a operar no inicio do seculo 20 em New York. Destinado a ser equipado com sons, luzes, fumo e canhão de água funcional.
O kit;


Início da montagem da estrutura que irá suportar o convés;


Bancada que irá suportar para além do motor o equipamento electrónico;


Estrutura superior;


Amura;


Início da construção da ponte de leme e detalhe de todo o interior com inclusão de toda a aparelhagem de leme, cartografia, rádio e beliche;


Utilização do primário para fazer sobressair as pequenas imperfeições a serem esbatidas posteriormente com massa de poliéster;


Inicio da colocação dos varandins;

Elaboração de uma nova chaminé em plástico descartando a de origem em cartão. Aplicação de alguns detalhes no apito e válvula de escape;

Adição de alguns pormenores na ponte de leme a saber, frisos, agulheta, projetor, lanternas e escadas. A iluminação neste local já se encontra instalada;

As portas estão no lugar e dá-se início ao trabalho de pintura;


Envelhecimento;


Pintura do casco;


Segundo o fabricante este conjunto de amarração é feito em madeira e plástico. Para lhe dar maior robustez, optou-se pela sua substituição por latão;


Início da forra do convés;


Envelhecimento do tabuado;


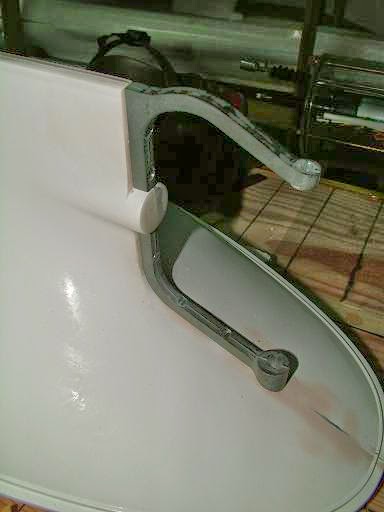
Modificação da ligação servo/leme por uma estrutura em latão mais robusta e completamente dissimulada;


Alteração da bancada e inicio da instalação dos componentes;

O barco salva vidas que difere do fornecido de origem;

Envelhecimento do casco e adição de alguns pormenores;

Fixação da chaminé e colocação dos cabos de aço, montagem do monitor de incêndio, projetor e outros detalhes;


Elaboração dos postes, colocação das boias e bote salva vidas terminado e colocado em posição;

Pintura dos mastros e eletrificação dissimulada do maior permitindo a aplicação de uma pequena lanterna.
Fixação das bocas de incêndio e machados;


Som e alteração da disposição do motor;

Pintura de pontos de ferrugem;

O suporte;


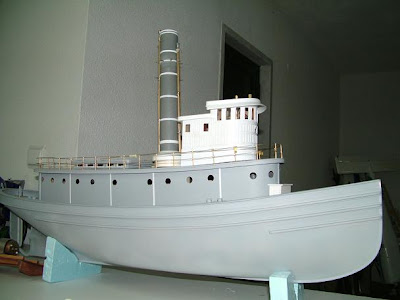
Conclusão do projeto;
Projeto concluído;

Travessia do canal;
O kit;

Apoio do leme;


Fixação das bocas de incêndio e machados;


Teste das funções;


Agreed! definetly the finest version of this model I have seen here on you tube. I'm hoping my model will be nearing completion here this year. Maybe next... Man I wish I could paint like that!!... love to see the weathering on models. awesome job! Randy C. Ithaca NY, USA.
ResponderEliminarBeautiful tug. Just bought one of these. Just wondering how many channels/functions does it have and what radio/ reciever did you use for all those functions? And which pump did you use for the fire gun that sprays water?
ResponderEliminarhey Michal! I'm sure you have long figured this out. but I thought I would share my design.. I am building this same "kit". I used a automotive wind screen squirt pump I bought from NAPA. I trimmed all the "excess" mounting tabs and "fat". it looked rather true to scale. like a large vertical pump would look like.
ResponderEliminarRandy Coolbaugh Thanks for your reply. Yes I figured that out already from a club member. Just how did you get the nozzle and light to rotate is the next question. Thinking about getting one of those old Robbe multi function transmitters to control her, what do you reccomend?
ResponderEliminarThe spot light and nozzle..... well I kinda went old school. I mounted a servo where the helm unit would be. with a shaft going straight up threw the roof with a 90 degree gear to drive the ships wheel. then at the celling of the wheel house I put another 90 degree gear to a horizontal shaft that goes aft to yet another 90 degree gear set with a vertical shaft threw the roof operate the nozzle. so all three functions are controlled by one servo and this wheel house servo is tied to the steering servo, so all will turn together. I steer right the spot light the ships wheel and the fire nozzle turns right.. instead of having independent servos and a zillion channels....lol. of course this is done all in the attempt to totally hide all signs of being radio controlled. This not being the easiest way to achieve these functions, but probably the cheapest. I love scale modeling but I'm not rich by any means, so I tend to scratch and kit bash in my building techniques.
ResponderEliminarRandy Coolbaugh I would have never thought of using one servo to do all three functions and tie that to the steering. Very clever.
ResponderEliminarthank you...
ResponderEliminarno comments. that's sad... beautiful model, excellent video!
ResponderEliminarwhere is this really nice pond?
ResponderEliminarI'm sorry for the delay in comments but I'm not being notified by blogger for some reason. Regarding the last question, the lake is in the city of Setúbal in Portugal.
Eliminar